How to Preserve Memories: Photos, Stories and Backups
Learn how to preserve memories step by step: digitize photos, record oral histories, store originals safely and keep digital backups that last.
There's a shoebox on the table, a stack of tapes beside it, and a phone full of pictures you haven't sorted. You recognise most of the faces, but you're less certain about the dates. Someone who could explain them keeps saying you should come over sometime.
Learning how to preserve memories starts with making that visit, not buying a scanner. A useful family archive needs readable copies, the stories behind them, and someone who'll keep it accessible. You don't need to finish everything before any of it becomes worth keeping.
Table of Contents
- Match Each Memory to the Right Method
- How to Digitize Family Photos Without Damaging Them
- Transfer Home Videos and Letters Before They Fade
- How to Record Oral Histories Your Family Will Replay
- Choosing a Physical or Digital Memory Book
- Storage Conditions and Backups That Last for Decades
- Keeping the Archive Usable Through a Yearly Review
- Finish the Week With One Labelled Memory
Match Each Memory to the Right Method
A tape may contain a family birthday, but without working playback equipment, the recording can be hard to access. A photo, letter, voice or heirloom each needs a different first step. YouGov's 2024 survey of parents with adult children reports on saved childhood photos, a reminder that keeping a memory and being able to identify and use it are separate tasks.
Start by identifying what you have and checking its condition. Avoid cleaning, playing, flattening or uploading an item before you know what it can safely tolerate.
Preservation method by memory type
| Memory type | Main risk | First action | Preservation method |
|---|---|---|---|
| Printed photos and albums | Fading, sticking, damp, sunlight | Minimise handling; stabilise fragile items before capture | Scan, then rehouse originals in archival enclosures |
| Negatives and slides | Film deterioration and scratches | Note unusual smells or visible damage; keep away from heat | Film scanning; specialist storage for significant colour material |
| Home videos on tape | Deterioration and unavailable playback equipment | Identify the format; seek inspection for damaged tapes | Digital transfer through suitable equipment or a service |
| Handwritten letters and recipes | Fading, tears and loss | Photograph flat without forcing folds | Scan with a transcript alongside |
| Voices and life stories | Stories never recorded | Arrange a recorded conversation | Audio recording with a written transcript |
| Phone photos and cloud files | Device failure and account lockout | Export an independent copy | Multiple independent backups |
| Heirlooms and objects | Damage and forgotten origins | Photograph with a provenance note | Images plus a written story |
Give visibly fragile material attention first, followed by memories that exist in only one place. A box of prints may be an obvious project, but recipes and spoken stories can disappear just as easily if nobody records their context.
Captions, a named family steward and a yearly test restore help keep an archive usable after the first round of copying. Choose one manageable project from these family memory-keeping ideas, then add notes about who or what each item shows. Perfect records are rare; clear labels and regular checks make the collection easier for relatives to use.
Practical rule: Protect or stabilise the original first, then make the copy.
How to Digitize Family Photos Without Damaging Them
Scanning works best when you separate preservation from presentation. The preservation file records what you have, including faded colours and damaged edges. A presentation copy can be cropped, brightened or restored without changing that record.
The National Archives of Australia's preservation digitisation standards identify uncompressed TIFF files as preservation masters and JPEG or PDF files as access copies. The same guidance makes an important distinction: digitisation doesn't replace original prints and film.
Work from condition to capture
Sort before scanning. Separate prints, negatives and slides, then group them by condition. Set aside curled, cracked or stuck items rather than treating the whole box as a flatbed-scanning job.
Photograph fragile items from overhead. Support them as they are, without forcing them flat or pulling them from a mount that resists. A less tidy image is preferable to a damaged original.
Save an uncompressed TIFF master. Treat this file as the faithful record, not the version you'll improve for a birthday slideshow. Keep the original photograph after capture.
Inspect every master at 100% magnification, following the quality-control approach in the digitisation guidance cited above. Look for missing edges, poor focus, dust, colour casts and skipped album pages before putting the originals away.
Make smaller JPEG or PDF copies for everyday use. Save restoration work separately, with a filename that clearly distinguishes it from the untouched master.
Record context as you go. Use consistent filenames and a spreadsheet or embedded metadata for creator, approximate date, place, people, event, source and scanning date. Mark uncertainty instead of turning a guess into a fact without anyone noticing.
Keep this visual checklist beside your workspace, while letting an item's condition determine whether it belongs on a scanner.
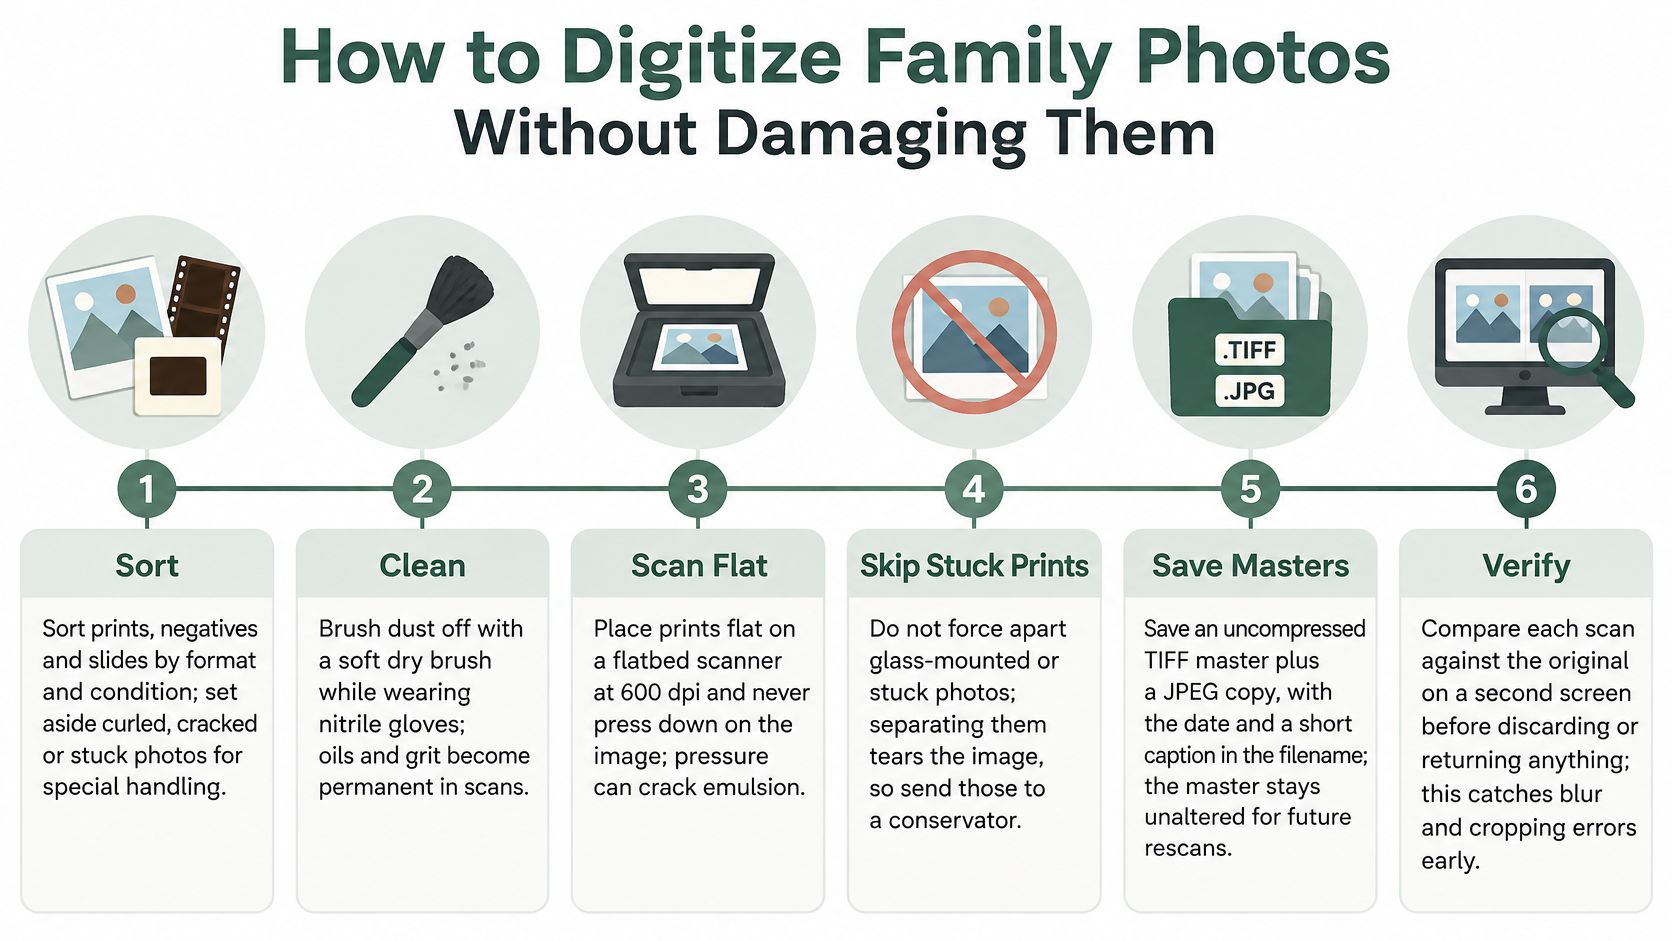
Keep the information around the image
Scanning only favourites is a reasonable way to begin, provided you record what you've left undone. An album inventory can plainly say that selected pages were captured and the rest remain in the original album.
Be cautious with automatic colour correction. If software makes a faded face look cleaner but removes detail, keep that result out of the master folder.
Consider a wedding print with names written on its reverse. Scan both sides and connect them in your records. The handwriting that looked incidental may be the only reason a future relative can identify the wedding party.
Transfer Home Videos and Letters Before They Fade
Lay out the recordings and write down the format shown on each label. Don't assume that every small cassette uses the same equipment, or that a reel of film belongs in a tape-transfer workflow.
For a recording you can't confidently identify or safely play, ask a transfer service to inspect it before proceeding. Use the conversation to establish what you'll receive, how the service handles damaged material, and whether the originals will come back.
Agree on the deliverables
- Keep a full transfer. Ask for the complete recording, not just edited highlights, plus a convenient sharing copy.
- Preserve existing clues. Photograph the cassette label and box, then connect those images to the transferred file.
- Check the result. Open the delivered file, listen to the sound, and inspect footage throughout, including the ending.
- Identify the speakers. Add a companion note explaining who's talking, who's behind the camera if known, and what's happening.
These family memory video ideas can help you decide which excerpts to share without replacing the full recording.
Letters and recipes need a slightly different approach. Photograph or scan each sheet in order, including the reverse, then place a transcript beside the image. Use brackets for unclear words and leave the handwriting visible rather than treating the transcript as a substitute.
A recipe records ingredients. A note about who cooked it, and when the family ate it, preserves the memory.
How to Record Oral Histories Your Family Will Replay
A relative pauses over a name, then remembers the story behind it. Give that moment room. A useful family recording depends less on polished questions than on consent, clear sound and enough context for someone to understand it years later.
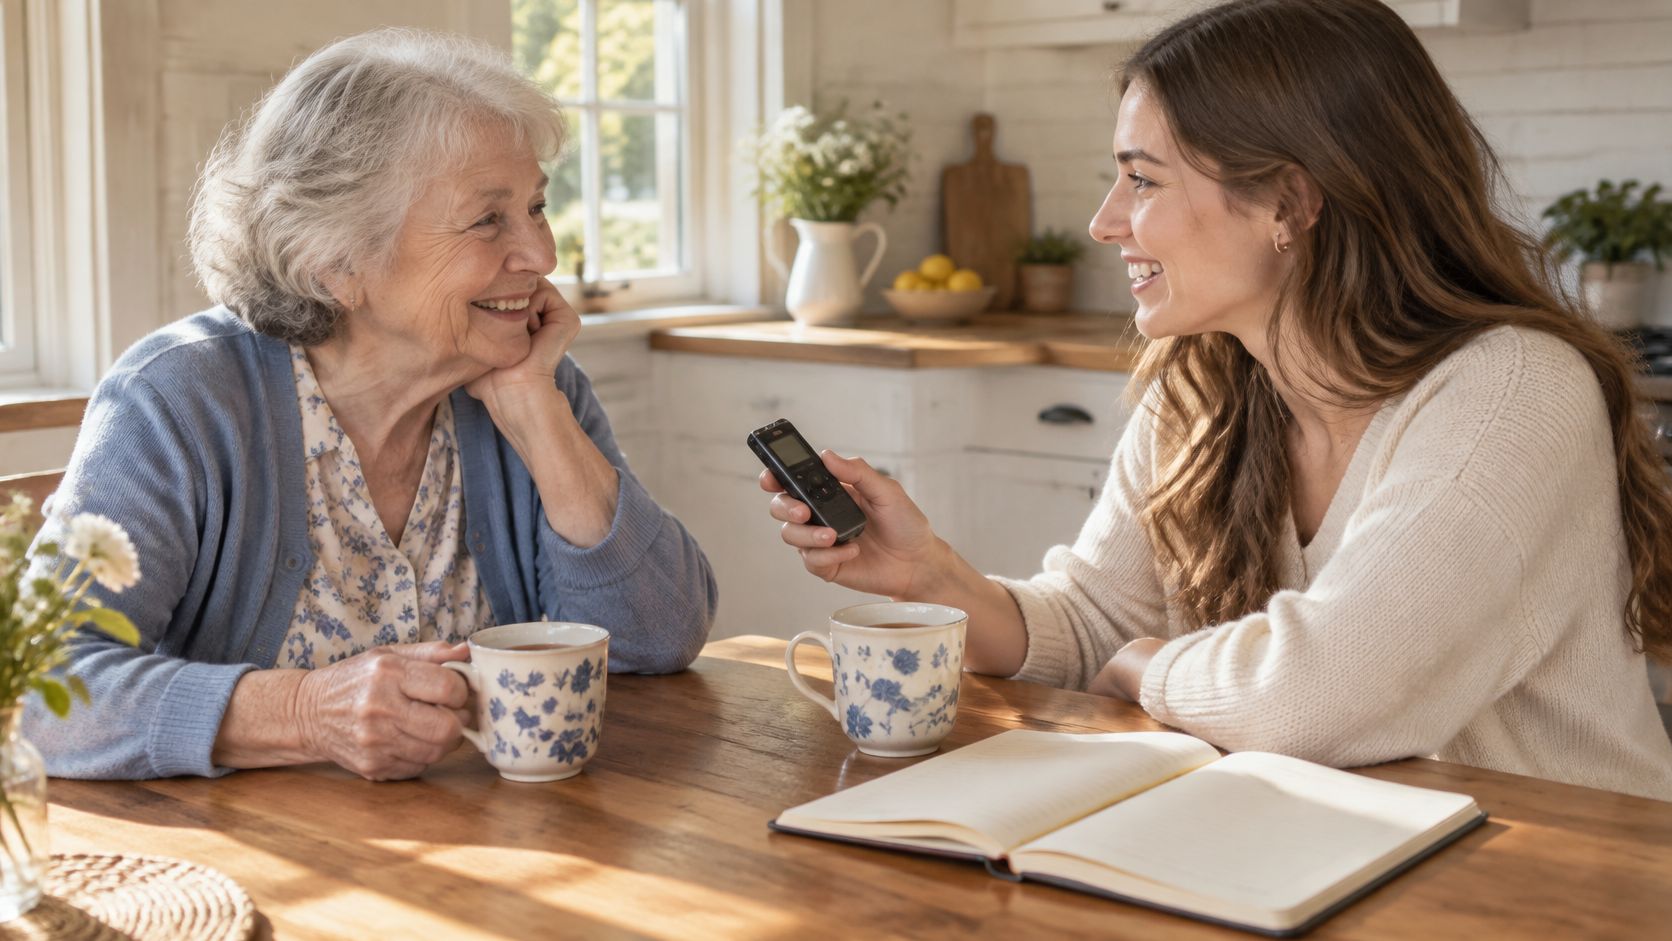
Prepare a conversation, not an examination
- Ask permission. Agree on recording and sharing, and respect topics the storyteller wants to keep private. Check again before sharing the recording beyond the family.
- Choose a quiet room, put the recorder close enough to capture a clear voice, and make a short test. Play it back before beginning. A fan or a phone left near the microphone can spoil otherwise good audio.
- Introduce the recording. Say the storyteller's name, the date and the place. Add who is asking the questions so future listeners can follow the conversation.
- Start with open prompts from these questions to ask family members, then follow the storyteller's lead.
- Let pauses happen. Ask what happened next instead of guessing or filling in details.
- Review together. Confirm names and unclear references, correct the transcript, and ask whether they would like another conversation.
Keep each session comfortable rather than trying to cover a whole life at once. If a date is uncertain, note the uncertainty and check it later instead of interrupting the story. Save the original recording, add a caption identifying the speakers and topic, and choose a family member to keep the files organized. Include the recording in a yearly test restore, so you know it still opens and can be heard.
This video offers another starting point for planning the conversation.
Choosing a Physical or Digital Memory Book
Will your family mainly read this together on the couch, or keep adding stories from different homes? That question is more useful than deciding whether paper or digital is better.
Both can work. Choose the format that suits the next use, while leaving yourself a way to preserve the underlying material.
Physical memory book versus digital timeline
| Factor | Physical memory book | Digital timeline |
|---|---|---|
| Survives a device failure | Independent of devices, but needs safe physical storage | Depends on independent, recoverable copies |
| Adding a story years later | Limited by page space or available inserts | Usually easier, subject to the tool's features |
| Relatives contributing | Pages or contributions passed between people | Remote contributions where supported |
| Sharing with distant family | Photograph, scan or make another edition | Share through the chosen service's permissions |
| Audio and video | Needs a separate playback method | Can include recordings where supported |
| Best for | Celebrations, gifts and reading together | An evolving collection with distributed contributors |
Choose the edition separately from the archive
A scrapbook or binder suits a milestone birthday, especially when someone wants to turn pages while another person reads aloud. Plan the story order before buying supplies. Otherwise, decorative pages can take up the space you later need for captions.
Use copies for display when you want to crop, rearrange or handle images often. Keep the original material in its preservation storage rather than assuming the finished book must hold everything.
For ongoing contributions, a digital collection offers a different workflow. Remembers.life is one option, with life-story profiles that bring photos, written stories and voice recordings into a timeline relatives can contribute to.
A hybrid approach is a sensible default: print a selected edition for the occasion and retain the fuller collection digitally. The printed book can have an ending without declaring the family archive finished.
Before committing to a digital tool, decide how you'll retrieve your material if you stop using it. Check export options, access permissions and who'll manage the account. Convenience today shouldn't leave the next keeper guessing where the files went.
Storage Conditions and Backups That Last for Decades
A shoebox of prints may seem safe in a closet, until damp makes photos stick together or heat accelerates fading. Aim for stable, cool and dry conditions, and check the space for seasonal changes. The U.S. National Archives' archival storage specifications describe archival requirements; their figures are not universal home targets. As a practical home approximation for paper photographs, aim for around 18–21°C and 30–50% relative humidity, keeping conditions steady rather than treating those numbers as a guarantee.
Storage targets by material
| Material | Temperature | Relative humidity | Key rule |
|---|---|---|---|
| Paper prints and albums | Around 18–21°C as a practical home approximation | Around 30–50% as a practical home approximation | Use suitable archival enclosures and support items against bending |
| Colour prints and acetate film | Specialist cold storage may be appropriate for significant items | Controlled for the material; seek specialist advice | Avoid improvised domestic cold-storage setups |
| Digital masters and copies | Suitable for the storage device | No archive-wide target | Keep independent copies and test recovery |
Use acid-free, lignin-free, PAT-tested enclosures made from suitable polyethylene, polypropylene or polyester. Store smaller items upright when appropriate, with spacer boards to prevent slumping. Large albums should lie flat if upright storage would strain or distort them.
Keep photographs away from kitchens, damp basements, hot attics, sunlight, pollutants and ozone-producing air cleaners. Moisture can make prints stick and encourage mould. For significant colour photographs or acetate film, ask a conservator about suitable conditions before changing how you store them.
Make recovery part of the backup
A useful general practice is the 3-2-1 backup rule: keep three copies, use two types of storage media, and keep one copy in a separate location. Add periodic file checks and an annual test restore. These are practical backup habits, not requirements attributed to the archival storage specifications. An external drive and a cloud copy can fill different roles, but only if someone knows how to access and restore them.
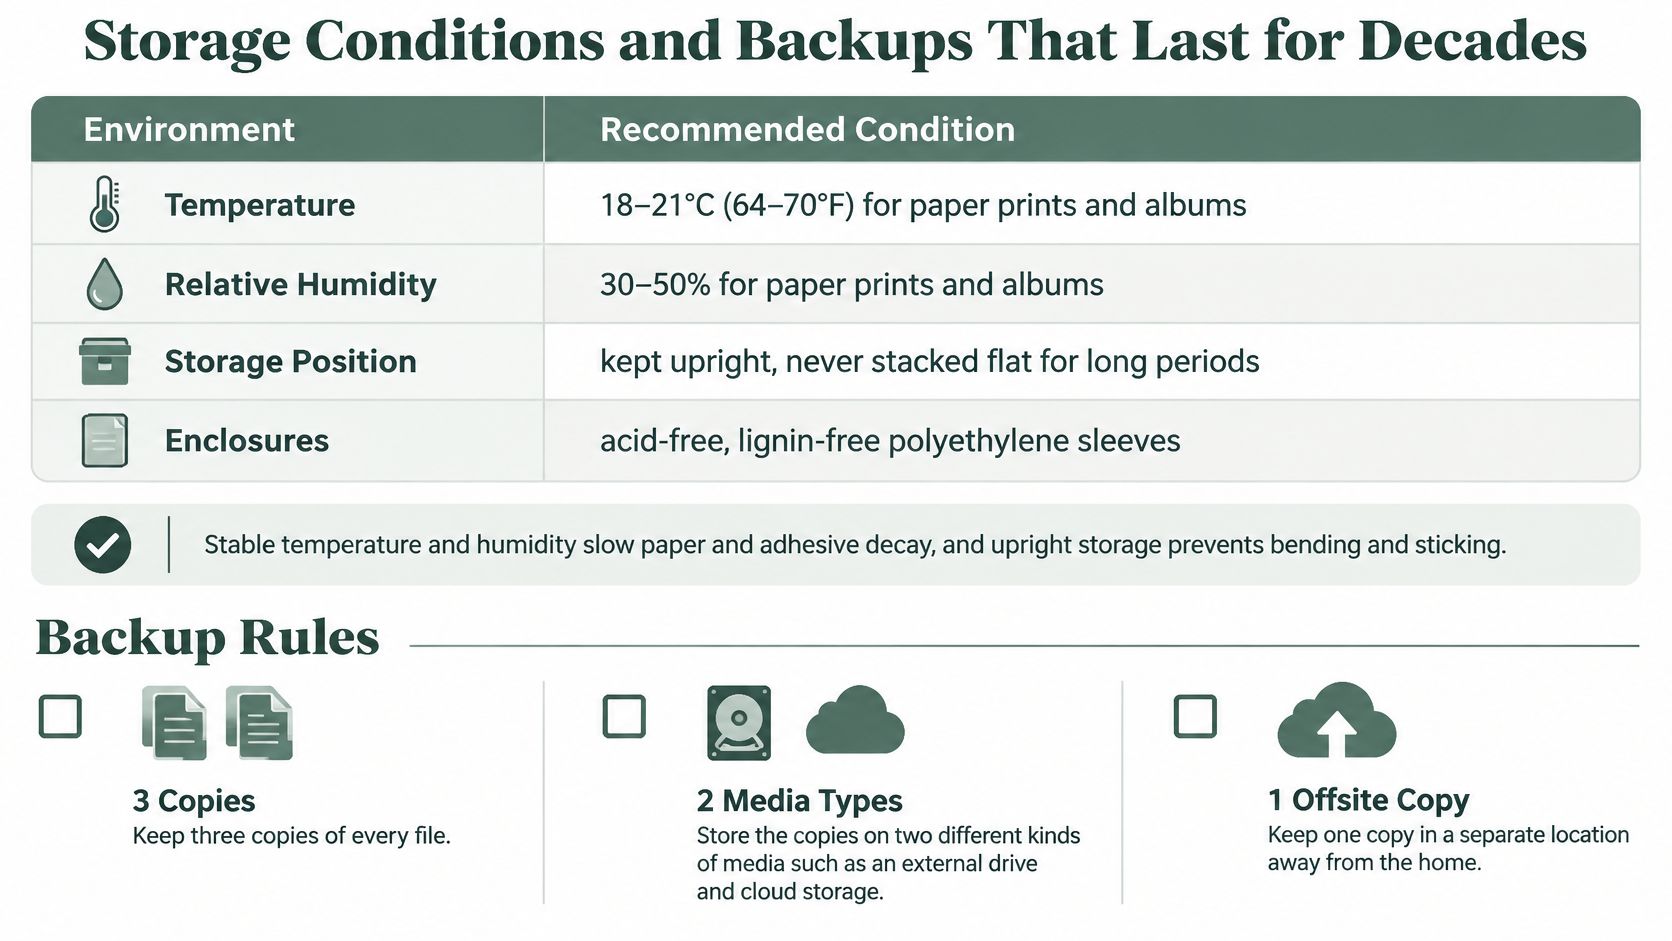
- Restore a sample folder. Recover it to a different location, then open the images, documents and recordings.
- Check file integrity. Compare checksums or file hashes if your backup tools support them.
- Replace failing equipment. Move the only recoverable copy before a drive becomes unreadable.
- Keep copies independent. A single cloud account, or drives stored in one house, leaves avoidable gaps.
Assign a family member to oversee backups, record where copies are stored, and make sure another person can follow the recovery steps. Review cloud access and export options using these family cloud-storage considerations. A successful upload is a start, not proof that someone else can retrieve the archive.
Keeping the Archive Usable Through a Yearly Review
A folder of scanned portraits can look complete until someone asks who the people are. In a typical unfinished archive, the keeper recognises the faces but hasn't written down the names. Bringing the pictures to a family gathering turns that missing work into a shared conversation rather than a solitary sorting task.
The family-archive research on context and continued access emphasises captions, interviews, format conversion, access transfer and assigned stewardship. Storage alone doesn't address those needs.
Make the review a conversation around the collection, not just a computer-maintenance appointment.

Give the work an owner and a date
Name a steward who coordinates updates, and a backup steward who knows where the material lives. Agree on access arrangements while the current keeper can explain them. Use secure password-sharing arrangements or written instructions held safely, rather than putting passwords in a shared caption spreadsheet.
Divide the review into manageable jobs:
- Context keeper. Maintains names, places, relationships and uncertainty notes.
- Story collector. Invites relatives to explain unfamiliar images or contribute recollections.
- Recovery checker. Runs the restore process and checks that older files still open.
These are jobs, not necessarily different people. A small family can share them without creating a committee.
Choose a recurring date that already brings people together. Review missing information, confirm that access instructions still work, and ask whether family circumstances require different sharing permissions.
The archive is usable when someone other than its current keeper can find, understand and open it.
End each review by choosing the next memory to add. That gives the family a modest next action instead of another promise to sort everything someday.
Finish the Week With One Labelled Memory
Set a finish line you can reach without emptying every box. Choose a photograph, a recording or a willing storyteller, then use the matching method described earlier.
- Make the copy. Capture the item safely or record the conversation with permission.
- Add the caption. Include the name, date and place where known, and mark what still needs checking.
- Complete the handover. Put the original away appropriately and make sure your chosen steward can find the digital version.
- Invite a contribution. Send it to a relative and ask for a missing name, a correction or a sentence of context.
- Schedule the review. Put the maintenance date in the calendar before you move on.
Don't measure the afternoon by how much remains. You've completed something another person can understand and use.
The first well-labelled memory matters more than the perfect archive you never start.
Remembers.life offers shared life-story profiles for photos, written memories and voice recordings, with transcription to help keep spoken stories accessible. Visit remembers.life, create a profile for someone in your family, and invite a relative to add the story behind a photograph.