Preserving Family Memories Through Oral History
Learn practical steps for preserving family memories through oral histories. Discover how to record, edit, and archive authentic stories for future generations.
Every year, 1.81 trillion photos are taken worldwide, about 54,000 every second, and 93% are captured on smartphones, according to this 2024 summary of global photography trends. Family memories now live mostly as files, not prints, which makes preservation a question of careful recording, thoughtful editing, reliable storage, and intentional sharing.
An oral history adds something a photograph can't. It preserves the rhythm of a voice, the pause before a difficult memory, the laugh that interrupts a sentence, and the small details that give an event its meaning. The work doesn't end when you press record. A raw interview needs sensitive curation so future listeners can follow the story without losing the person who told it.
Table of Contents
- Why Capturing Family Voices Matters Now
- Preparing for a Meaningful Oral History Interview
- Editing Recordings for Clarity and Natural Pacing
- Protecting Authentic Voice and Emotional Resonance
- Archiving Digital Files and Physical Memorabilia
- Sharing Stories Across Complex Family Structures
Why Capturing Family Voices Matters Now
A 2022 poll of more than 6,000 Americans found that only about one in three had recorded or documented a conversation with a loved one to preserve their memory. Nearly half regretted not doing so after that person died, according to polling on digital memory preservation. The regret is understandable. A written summary can preserve facts, but it cannot reproduce a parent's cadence, a grandparent's chuckle, or the way someone says a familiar name.
Recording habits also differ by age. About 25% of people aged 45 to 65 had recorded a loved one's stories, compared with 44% of people aged 18 to 29 and 42% of people aged 30 to 44. The figures suggest that phones and simple audio tools have made preservation more familiar in everyday life, rather than showing that one generation cares more than another.
Oral historian Michael Frisch and other practitioners note that unrecorded stories typically lose detail within two to three generations. That makes the next 70 to 100 years important for protecting names, voices, and context. A family account can fade like a photocopy made from a photocopy: the broad outline remains, while the identifying details disappear. A family history documentation guide can help families record those details before they become uncertain.
Practical rule: Treat yourself as the family archivist, not merely the person holding the phone.
The role requires consent, patience, and a clear system, rather than professional equipment or perfect genealogy. Begin with one conversation. Preserve the original recording, create a careful listening copy, and note who is speaking, when the interview took place, and which people or events are mentioned. Those notes give future relatives a map through the files.
Editing belongs to this preservation work. Trim repeated explanations, long silences, and distracting tangents so listeners can follow the account, while keeping the pauses, laughter, uncertainty, and emotion that reveal the speaker's character. The aim is a clearer story, not a polished performance.
Preparing for a Meaningful Oral History Interview
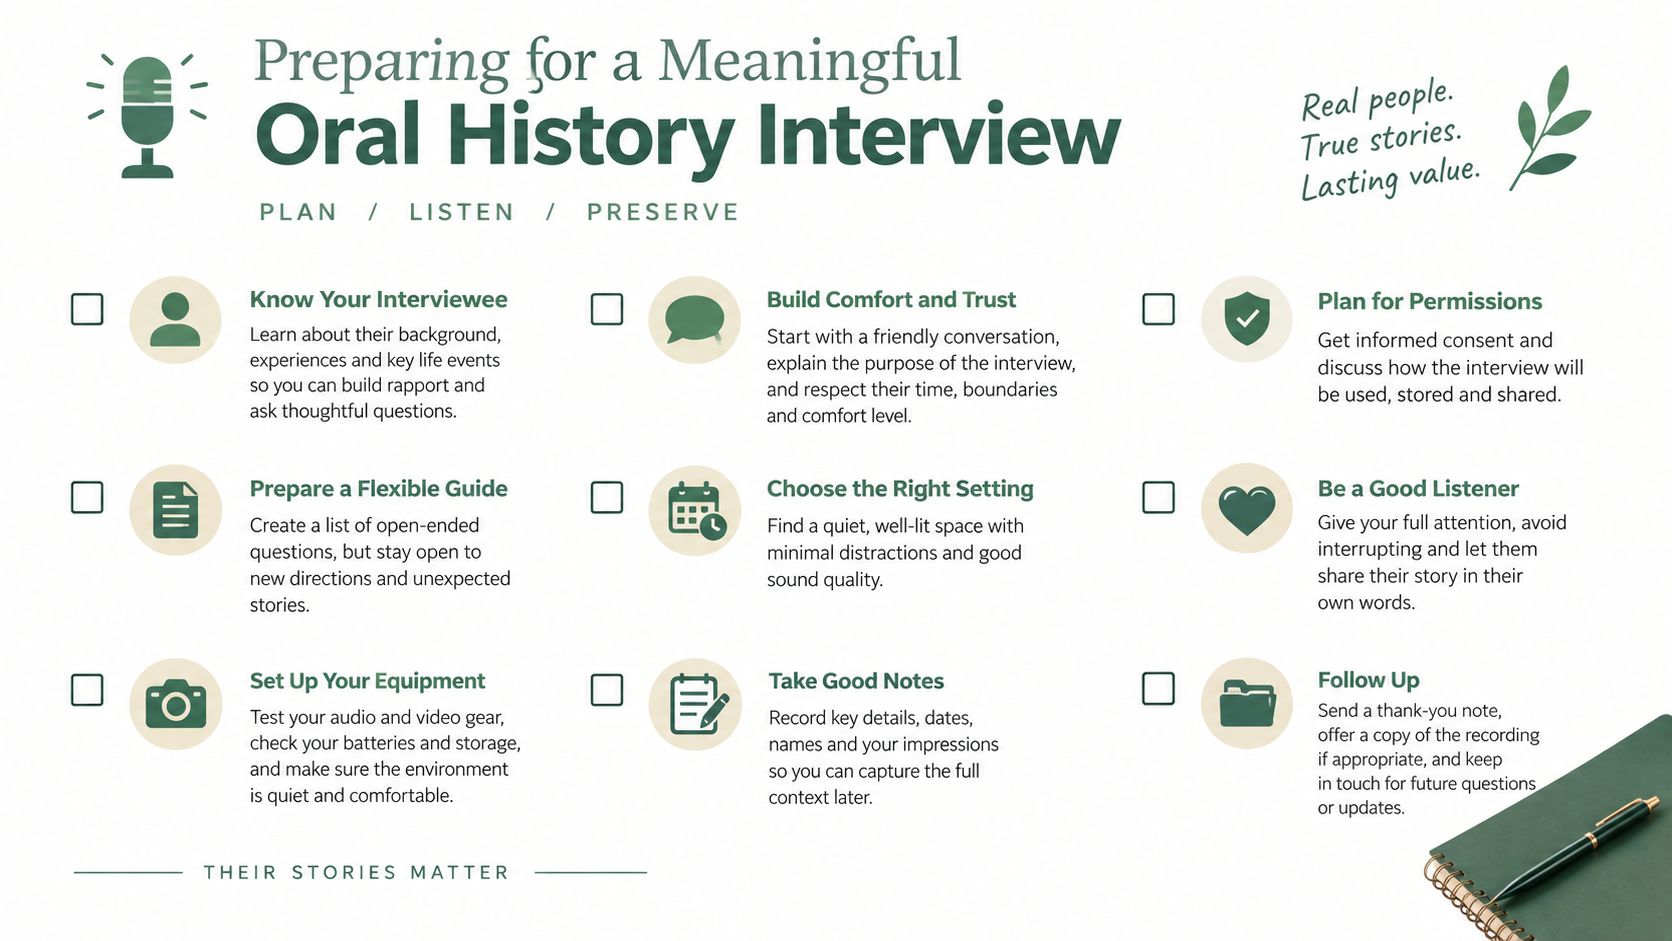
Great editing begins before the interview. A noisy recording forces you to make harder choices later, while a calm room and a thoughtful question give the speaker space to remember in complete scenes rather than short answers.
Choose a quiet room with soft furnishings, close windows, silence nearby phones, and switch off appliances that hum. Place the microphone close enough to capture a clear voice without making the speaker feel watched. If you're using a phone, keep it stable on a table rather than holding it in your hand, and make a short test recording before the actual conversation.
Build questions that invite stories
Closed questions produce fragments. “Did you enjoy school?” may receive “yes” or “no.” An open prompt such as “What did a normal school day feel like when you were young?” invites place, people, routine, and emotion.
Prepare themes rather than a rigid script:
- Early life: Ask about the home, neighborhood, daily responsibilities, and people who shaped childhood.
- Turning points: Ask what happened, what the speaker believed at the time, and what changed afterward.
- Work and relationships: Invite stories about first jobs, friendships, courtship, parenting, or migration.
- Objects and places: Hold up a photograph, recipe, letter, or household item and ask what it brings back.
- Meaning: Ask what the speaker hopes younger relatives understand about a particular experience.
Don't interrupt every pause. A quiet moment often means the person is finding the memory, not losing the thread. Use gentle prompts such as “What happened next?” or “Can you describe that place?” rather than correcting details while the story is unfolding. For more prompts, use these interview questions for parents.
Ask permission before recording, and explain how the files may be edited, stored, and shared. Someone might want a private version for immediate family and a separate version for wider relatives. Record the date, participants, location, and topics at the beginning or in a companion note.
A short video can preserve gestures and expressions, but audio often feels less demanding. Choose the format that lets the speaker relax.
For a visual walkthrough of the interview process, use the following video:
Editing Recordings for Clarity and Natural Pacing
Editing an oral history isn't about removing every imperfection. It means helping a listener stay oriented while keeping the speaker's natural timing. Work from a duplicate of the original file, and never overwrite the untouched recording.
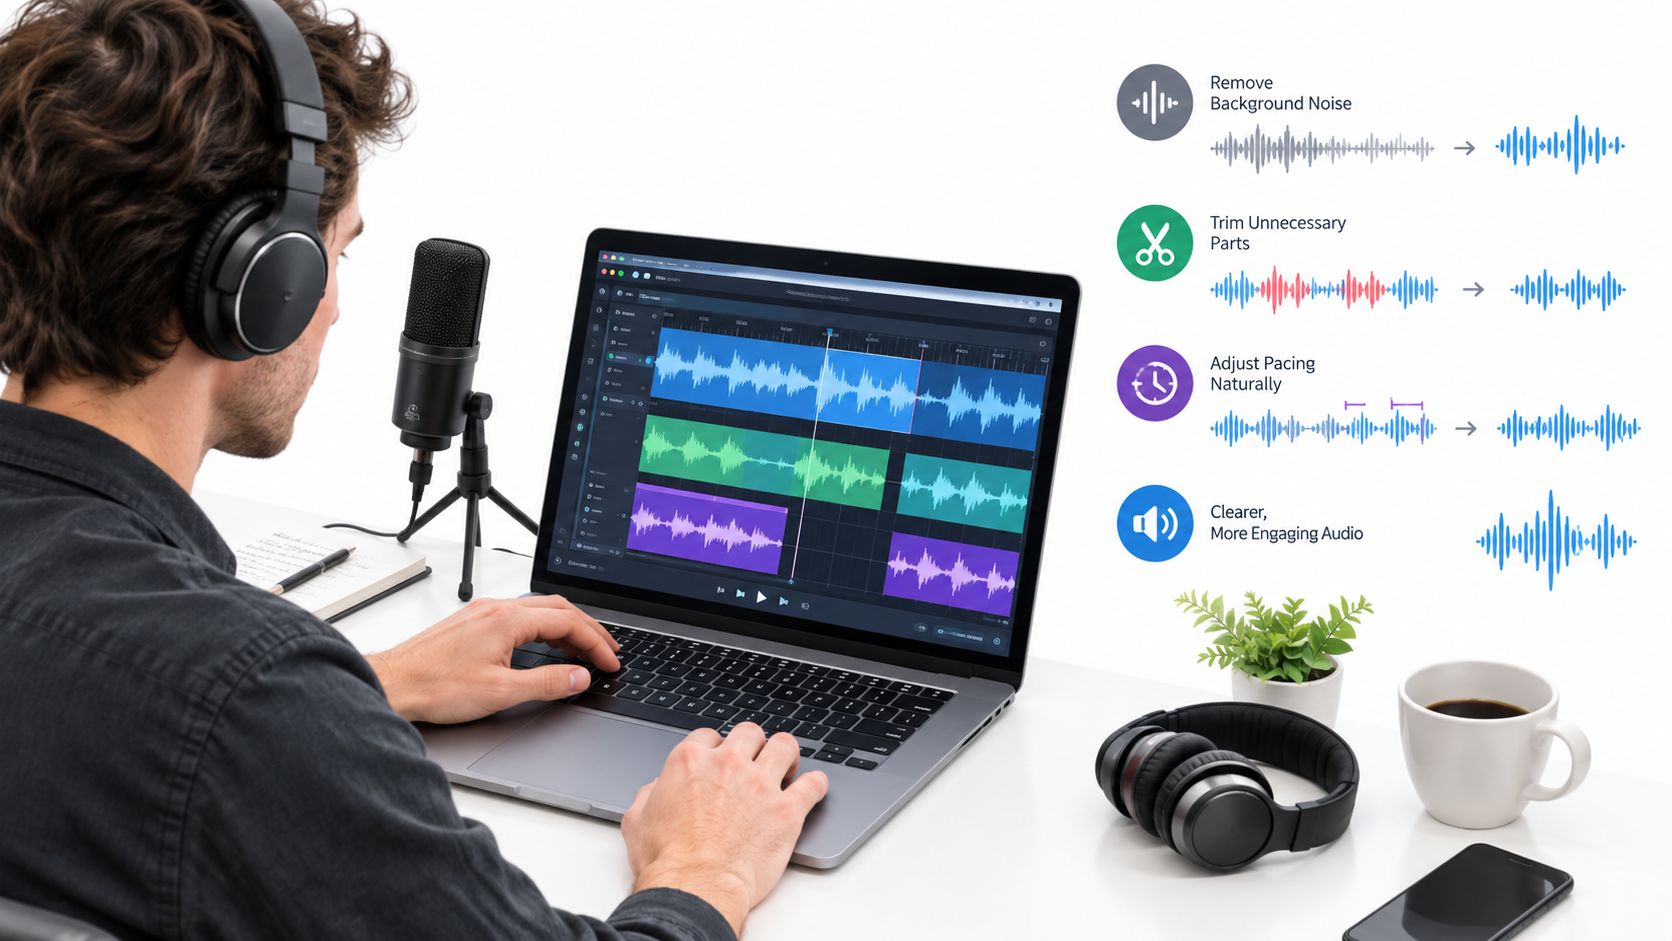
Begin by listening once without cutting. Note the strongest passages, repeated answers, long stretches of silence, unclear sections, and moments that need context. Software such as Audacity, Ocenaudio, GarageBand, or DaVinci Resolve can handle basic trimming and noise reduction. Choose the tool you can use confidently, because careful listening matters more than an elaborate interface.
Make the invisible edit
Remove sections that clearly don't contribute, such as repeated technical checks, an extended search for a name, or a tangent that never returns to the subject. Keep short pauses that show thought. A breath before a difficult story can carry meaning, while a long silence caused by a forgotten recording setup may only interrupt the listener.
Use room tone to hide abrupt cuts. Room tone is the quiet background sound captured in the same space when nobody is speaking. Copy a small portion of it and place it under a cut so the background doesn't suddenly drop to digital silence.
A practical sequence looks like this:
- Duplicate the master: Keep the original recording unchanged and create a working copy.
- Create a rough cut: Remove obvious false starts, technical interruptions, and unrelated material.
- Preserve complete thoughts: Don't cut out a sentence merely because it contains a pause or repeated word.
- Smooth transitions: Use room tone and short fades to prevent clicks and unnatural jumps.
- Reduce distractions carefully: Apply modest noise reduction to hum or hiss, then listen for metallic or watery artifacts.
- Balance volume: Make the speaker easy to hear without making breaths and room noise harsh.
- Add structure: Divide a long conversation into chapters based on subjects, places, or periods of life.
- Review away from the editor: Listen through headphones and ordinary speakers. A cut that sounds fine on one system may feel abrupt on another.
Shape the story without rewriting it
An interview can follow a simple arc: where the speaker began, what happened, how the experience felt, and what it means now. You can create that shape by arranging whole passages, adding chapter titles, or recording a short introduction. Avoid splicing words together to create a sentence the person never said.
Keep a change log for substantial edits. Note the source filename, edit date, software used, noise reduction applied, and passages removed. The life story audio recording guide offers useful context for building a recording workflow that remains understandable later.
Export an access copy in a convenient format, but retain the uncompressed or highest-quality working version as your preservation file. Save the transcript separately so relatives can search names and places without treating the transcript as a replacement for the voice.
Protecting Authentic Voice and Emotional Resonance
A polished podcast and a family archive have different priorities. A podcast may remove every stumble to maintain speed. An oral history should protect the small signs of thought that reveal how a person remembers.
Consider a speaker describing the day they left their childhood home. They pause, inhale, and say the street name twice because the first attempt catches in their throat. A strict editor might remove the repetition. A family archivist should listen first. The pause and second attempt may tell future listeners that this isn't a neutral fact about a street. It's a place charged with feeling.
The same principle applies to laughter. A loved one might laugh after describing a mistake, not because the event was trivial but because humor is how they carry embarrassment. Cutting that laugh could make the story sound colder or more dramatic than the speaker intended.
Decide what belongs in the final version
Use three questions when you're unsure about a cut:
- Does this passage clarify the story? Keep details that identify people, places, sequence, or consequence.
- Does this passage reveal the person? Keep distinctive expressions, laughter, hesitation, and changes in tone when they add character.
- Does this passage protect the speaker? Remove private information or sensitive material if the speaker asked you to exclude it.
You can make more than one version. A complete family master might include personal material that shouldn't circulate widely, while a shorter sharing copy can omit intimate details. Label those versions clearly, and record who approved the edits.
The aim isn't perfect speech. The aim is recognizable presence.
Don't correct every historical inconsistency during editing. If the speaker remembers a date differently from a document, preserve the account and add a factual note outside the spoken recording if clarification matters. The archive can hold both memory and evidence without pretending they're the same thing.
Listen for the emotional anchor of each story. It may be a sentence about a parent's sacrifice, the sound of a train, a recipe remembered by smell, or a moment of reconciliation. Build the edit around that anchor. A shorter file with its emotional center intact will serve the family better than a technically flawless version that feels anonymous.
Archiving Digital Files and Physical Memorabilia
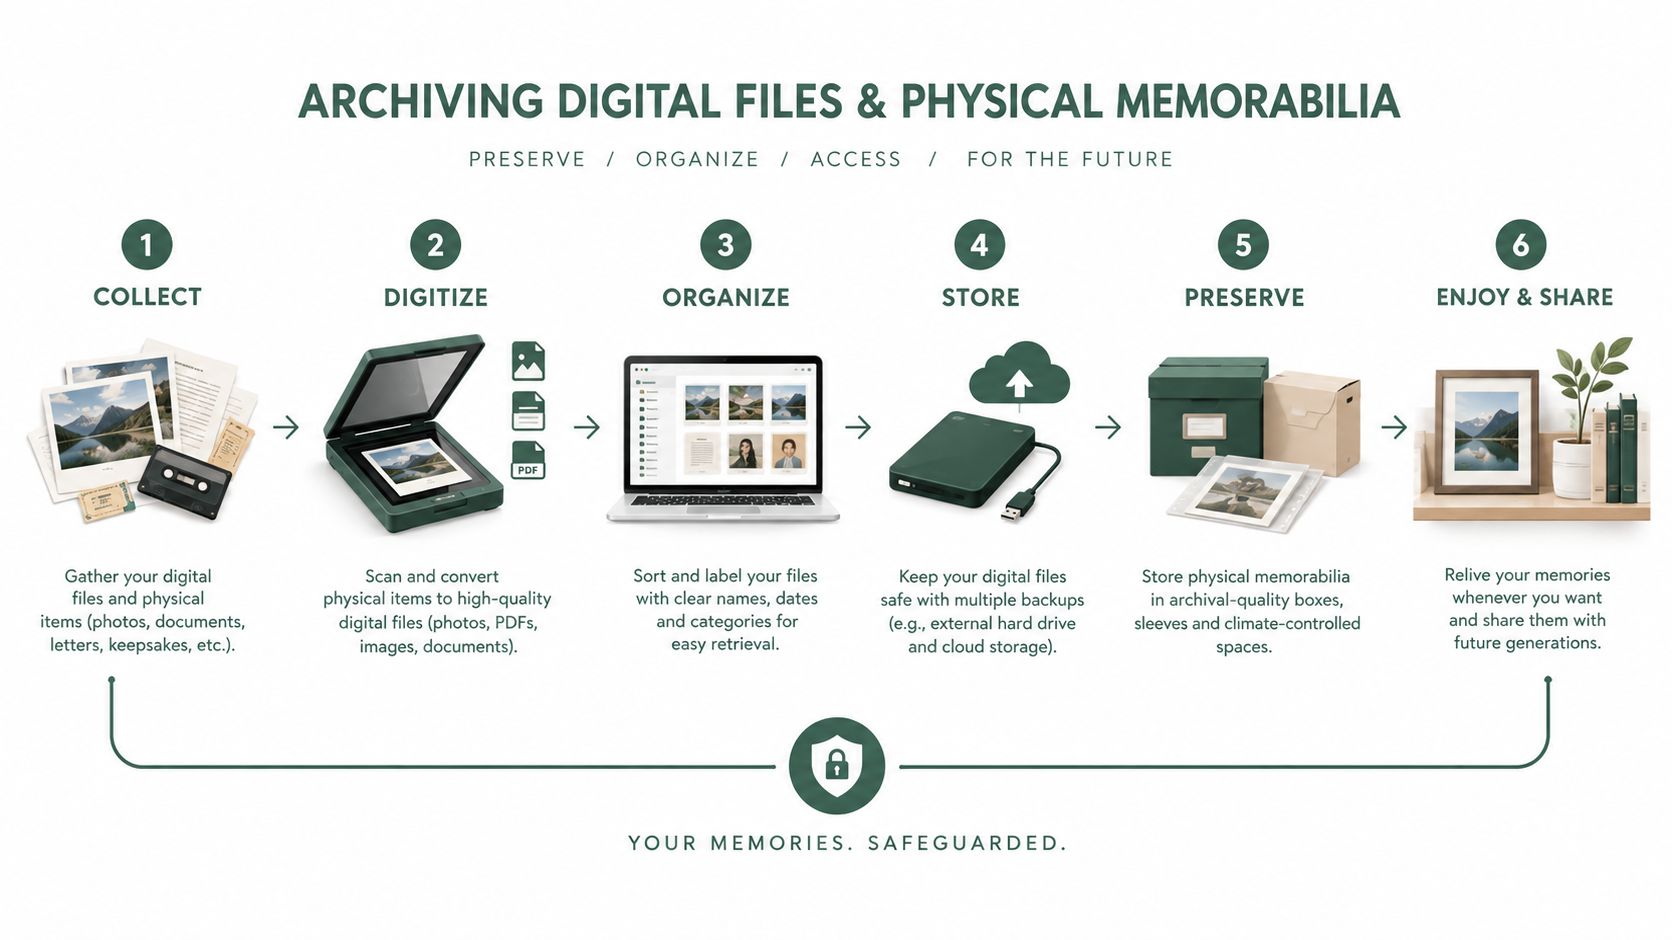
An interview becomes an archive when relatives can find it, open it, identify its contents, and use it years later. Keep the original recording, edited master, listening copy, transcript, photographs, consent notes, and descriptive information together in a predictable folder structure. This arrangement works like a labeled family-history cupboard: every item has a place, and its connection to the story remains visible.
Use filenames that carry context. Include the date, speaker, subject, and version, such as 2026-09-26_Samuel-Lee_childhood-home_master. Avoid names such as final2.wav, which provide no reliable record of what the file contains. Add full names, places, dates, and relationships in filenames or metadata where practical.
Build digital redundancy
Archivists recommend the 3-2-1 backup rule: three copies, stored on two media types, with one offsite copy, according to archival guidance on family photos and documents. A laptop can fail, a portable drive can disappear, and an online account can become inaccessible. Separate copies reduce the risk that one event will erase an entire family record.
Keep one local working copy for editing, another on a separate storage medium, and an offsite copy in a trusted location or service. Check that backups can be opened. A backup that has never been tested is an assumption, not a dependable archive. For a fuller workflow on converting physical items into durable files, see this memories to digital guide.
For images and scans, archival guidance commonly recommends TIFF as a preservation master, with JPEG or PDF as access copies. Keep the highest-quality original for future work, then create smaller versions for email or sharing. Fragile photographs should not pass through an automatic document feeder, which can cause streaks or physical damage. Before scanning, remove clips and rubber bands, arrange paper items, and record their original order.
Control the physical environment
Paper lasts longer in stable, moderate conditions. U.S. archival guidance recommends keeping paper archives below 75°F and below 65% relative humidity, while avoiding humidity below 15%, which can make paper brittle, as explained in the National Archives storage guidance. Other archival recommendations favor a practical range of 30% to 50% relative humidity and 65°F to 70°F.
Store letters, photographs, and documents in acid-free or lignin-free boxes, with polyester or polypropylene sleeves. Keep items flat or upright without crowding them. Choose a location away from direct light, exterior walls, basements, attics, leaks, and the floor. A small humidity sensor can reveal unsafe conditions early. Mold can begin to grow above about 60% relative humidity, according to Library of Congress preservation guidance.
Families may also use remembers.life for profiles, stories, photographs, videos, milestones, and voice recordings. The service can organize contributions in a memory profile and shared family room, with automatic transcription for voice recordings. Treat it as one layer of the archive, not the only copy.
Sharing Stories Across Complex Family Structures
A preserved story can still cause harm if access is careless. Blended families, co-parenting arrangements, adoption, separation, and estrangement can make a simple “share it with everyone” plan unrealistic. A 2026 nationally fielded survey of 1,001 parents found consistent gaps in who appears in family photos and why some family members are left out, highlighting the need for inclusive family memory preservation.
Begin by identifying people, not just files. Ask who appears in the recording, who has contributed context, who should approve sensitive material, and who should receive access. Don't assume biological relationship alone determines the right audience. A stepchild, former partner, close family friend, or caregiver may hold an essential part of the story.
Create access levels that match the material:
- Private masters: Original recordings and sensitive interviews for designated custodians.
- Family copies: Edited stories suitable for relatives with relevant context.
- Wider sharing copies: Carefully reviewed material with personal details removed where needed.
Include a short description with every shared file. State who is speaking, when the interview happened, what it covers, and whether the recording may be downloaded or reused. If family members disagree, preserve the disagreement in your notes rather than forcing a single version of the past.
Digital legacy planning matters too. Choose a custodian, document where the archive lives, explain how accounts can be accessed, and state what should happen after your death. The technical archive becomes a living family resource only when people know how to reach it and feel respected when they do.
remembers.life helps families create a memory profile for a loved one, add stories, photos, videos, milestones, and voice recordings, and invite relatives to contribute through a shared family room. Visit remembers.life to start organizing oral histories and the memories that give them meaning.